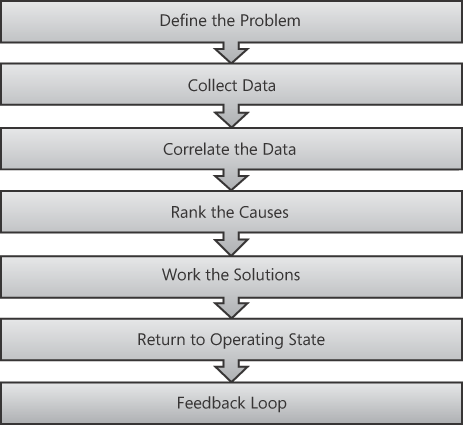
Troubleshooting
is part art and part science. This section presents one possible method
to troubleshoot issues, but it is not necessarily the only approach you
can take. The goal of troubleshooting is to quickly resolve the issue
and find the root cause whenever possible. A feedback loop should be in
place for making changes to the environment or processes and prevent
the issue from happening again. Figure 1 outlines the troubleshooting process.
1. Define the Scope
It sounds obvious, but
defining the scope is a critical step in the troubleshooting process.
Without clearly scoping and defining the problem, it's easy to get
sidetracked or not have everybody working to solve the same problem.
Verifying and recording as much information about the problem as
possible is very important. You must also record the initial state of
the environment before changes take place and that information is lost
forever.
2. Collect the Data
This step involves
collecting data from sources such as event logs, log files, and
performance information. If possible, record the steps to reproduce the
problem. Sometimes it helps to capture data from ancillary servers. For
example, when troubleshooting performance issues with Exchange, you can
get a complete picture by coordinating data captured from a client and
server at the same time. On both the client and server use perfmon,
network tracing, memory dumps, and other tools, and record the exact
time that the issue occurs. This way you can look at the problem from
several different sources to get a complete picture.
3. Correlate the Data
With the problem statement and
the collected data, make a list of potential causes for the problem. It
is also important in this step to pay attention to the problem details
and error codes.
One helpful tool with this step is a dependency map. An example of a dependency map is shown in Figure 2.
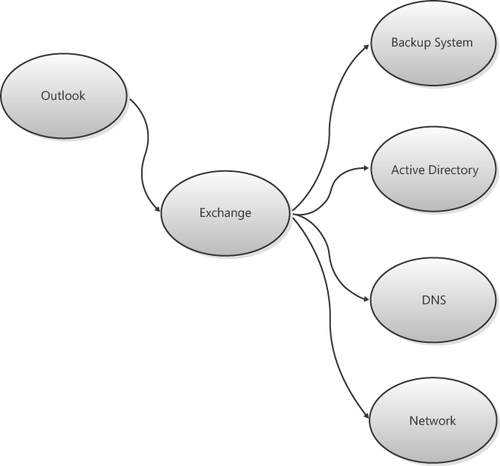
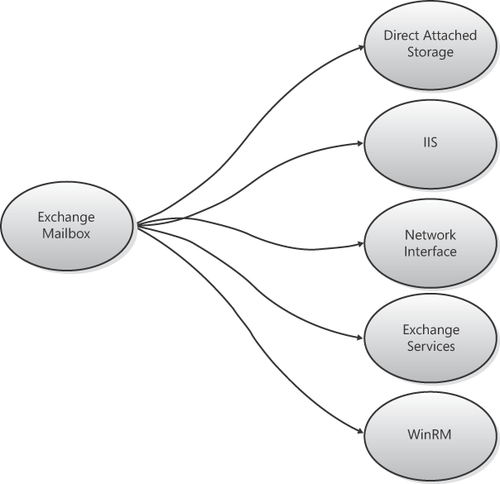
From the high-level example in Figure 3, you can pull out an element and create a dependency map for it. For example, Figure 17-5
expands the Exchange service by specifically creating a map for the
Exchange Mailbox role. It is possible to continue this process and pick
another element, such as direct attached storage, and create a
dependency map for it.
Creating these dependency maps helps quickly determine dependencies and can help focus the areas to troubleshoot.
4. Rank the Causes
The next step is to make a
list of the possible causes, adding additional emphasis on
characteristics such as ease of implementation of solution, probability
of cause, risk, and so on. This step will help focus on the most
likely, easiest, or lowest-risk test solutions.
5. Work the Solutions
When it's time to work the
solutions, start with whichever solution ranked highest from the
previous step. Be careful not to make multiple changes at once, and
record the changes made and any observations on the change's impact.
Continue working the solutions until the problem is resolved.
6. Return to Operating State
It is important to undo any
changes made while troubleshooting from the previous step. Logging,
tracing, and other tools may have an impact on server performance, so
removing any unnecessary settings is important.
7. Feedback Loop
Document the root cause and
any details learned from troubleshooting and resolving the issue. If
the problem resurfaces in the future, it's possible that a different
group of people may be troubleshooting the issue. Good documentation
preserves institutional knowledge that would be otherwise lost.